A majority of anglers will have few choices when it comes to using boilies. You can either buy boilies from known manufacturers, or you can make your own. It takes time to learn this skill, but it is 100% doable. Affordable home boilies do exist and are being utilized by a lot of anglers. Making boilies from basic ingredients may not be your ideal way of starting a fishing adventure. But you will appreciate it once you have learned how effective they can be. Homemade boilies can be as effective as commercial ones. It has become one of the most well-known baits on the market for catching fish since it has more flavors than you can imagine. However, one thing you should know note about using this bait is how to make boilies float. It is crucial to make them float to make them highly effective bait.
Do It Yourself Floating Boilies– how to make boilies float

Boilies are of two types. They come as either floating or sinking. In this article, we will discuss floating boilies and, be more precise, how they can be made at home. The main benefit of floating boilies is that they will float up from the bottom at an ideal distance, making it easier for the fish to notice the nozzle. It becomes very justified using a nozzle, especially on muddy bottoms and water.
Ingredients for making floating bullies

There are tons of recipes for cooking boilies. The most effortless way to make boilies is to purchase bait and then make the boilies. Prepare the following:
- Several packages of carp baits depending on the number of boilies you will be making.
- One raw egg
- A big bowl for kneading dough
- Pan with water.
- Cutting board and knife
- Flavorings and other additives.
The process of making floating boilies– how to make boilies float
Step 1. Kneading the dough
After mixing the raw egg into the big bowl, gently sprinkle bait while mixing the mass. In the end, you need to achieve a smooth consistency so that it doesn’t stick to your fingers.
Step 2. Creating Balls
The boilies themselves are already created at the second step, and their shape and size are established. Their size will depend on the size of the fish you want to catch. When it comes to fishing for carp, boilies are made up to a size of 20 mm. As for the process itself, the first step is to roll out the dough on the board then cut it into thin strips. Both are created from these pieces. You can do another option by rolling up boilies and tearing pieces of dough from the main piece.
Step 3. Cooking the boilies
In this process, the boilies are submerged in boiling water and then boiled until it floats. After the water is drained out and the finished product is cooled.
Step 4. Drying the Boilies
To make floating boilies, they must be dried thoroughly. At the same time, excess moisture evaporates from them, and they cease from drowning in water. You can utilize a microwave oven or conventional open in the drying process. It is crucial not to overdo it since the boilies can easily be burned. Check whether the boilies are heated correctly.
Step 5. Scent
It is crucial to apply scent on the boilies immediately before fishing. To do this, submerged them in flavors before casting them on the water. You can also apply scents by spraying them on the boilies. There are different colors and scents for different types of fish. Once you have done this, the bait is ready for testing. All these steps are quite simple to follow, and you save a few dollars since you do not have to buy commercial boilies.
Homemade Boilies– how to make boilies float?
Boilie Preservatives
When utilizing boilies as your primary bait for fishing, you will also come across the decision whether or not to use preservatives or not for your boilies or whether to purchase commercial boilies with preservatives.
Adding preservatives gives you the benefit of storing the boilies at room temperature or on store shelves without losing its freshness.
If you don’t have natural preservatives, you will need to store your boilies in the freezer or the refrigerator. A majority of anglers go back and forth on the advantages and disadvantages of which one is the best option. Still, the main argument is that freezer boilies tend to last better due to the natural and nutritional benefits they give to the fish, making them more attractive than boilies with added preservatives.
The following are typical sizes for boilies:
- 10mm
- 12mm
- 15mm
- 18mm
- 20mm
- 22mm
The following is an idea of what size you should utilize for each of the boilies discussed:
- 10mm- Size- 4 Hook
- 12mm- Size 10 Hook
- 15mm0- Size- 8 Hook
- 18mm- Size 6 Hook
- 20mm- Size 6 Hook
Choosing the Correct Size Boilies
The bigger the boilies, the more flexibility you will have when you cast and the pre-baiting process. It is especially useful if you are utilizing a catapult.
If you do not require distance casting, smaller boilies will work just fine, but if you require additional power and weight, you will need to choose heavier boilies.
Selecting the Correct Color Scheme for Your Boilies
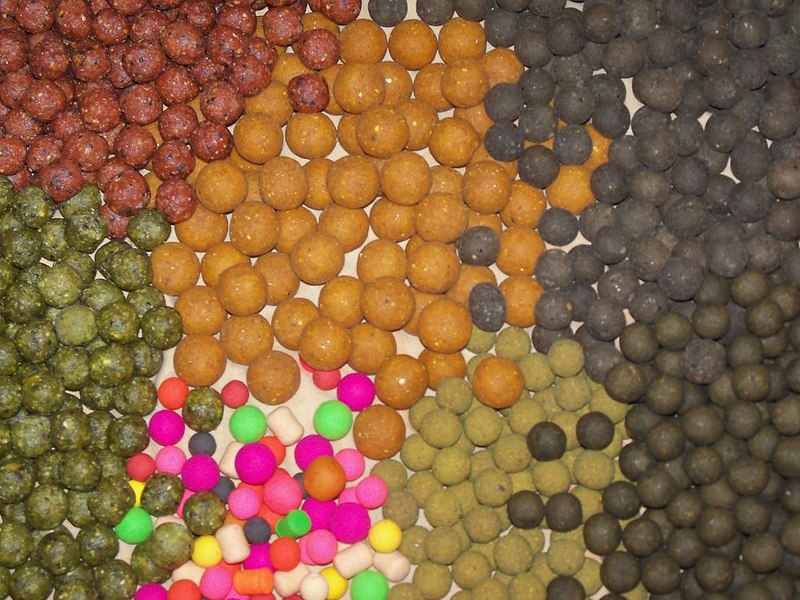
Color is a huge factor when it comes to fishing. Fish have excellent sight and a strong sense of smell. Colors that are bright tend to perform better, depending on the current season. Try utilizing brighter colors such as pinks, yellows, and even whites to have good results.
You can switch up your strategy with boilies and go with the blend in approach. If you are in an area hammered by fishing all year round or you’re certain that the fish have felt pressure from anglers, you may want to blend in the crowd or match the natural colors of the water body you are fishing.
It may be that the fish are a little stressed when it comes to bright colors and may welcome the change that will urge them to get a nice bite.
What are Boilie Pop-Ups?
Boilies pop-ups have become well known among anglers since it has many unique features. First off, the pop-up can float above the weedy water, which in return will create more visibility for your bait, which will ultimately lead to more chances of getting a strike.
No Tangle with Pop-Ups
Pop-ups can also benefit the angler by not allowing the line to get tangled up. Typical bottom rigs or bottom fishing can often get tangled once taken by the fish, but it is ultimately released or ejected. The same is not true with pop-ups.
When utilizing pop-ups, you will want to utilize a secure and strong hook and choose your preferred size of boilies.
How to Make Affordable Boilie Mixture? — how to make boilies float?
In the following, we will discuss the ingredients you can use to make affordable homemade boilies mixtures or bait for catching fish all year round.
- 50% Binder
- 30% Protein
- 10% Soluble Protein
- 10% Texture
These numbers don’t have to be exact. There is some room for a bit of swapping. For example, if you want a 20% solution, that is perfectly okay and really won’t damage the result.
Every angler will have different personal preferences on the mixture, but the above is a good rule to follow.
The binder is going to dictate how well everything gets stuck together.
It is also your basis for the mixture. Utilizing just common flour to make the boilies is fine as a binder agent, but you can also opt for other options such as maize.
It is crucial not to make the entire mixture all plain floor.
Get an ideal mix going with other ingredients. If you are following the 60% rule, you may want to try 20% semolina wheat 20% as your flour, and finally 20% rice flour as your binder mix.
Proteins
In the absence of protein, you are basically dead in the water. The fish have genetically been attracted to protein in their diets since time began, and that is not going to change. It would help if you had a good mixture of protein for the boilies for it to be successful.
Use Milk Proteins and Fish Meal for Your Protein Source
If you’re fishing in wintertime or even ice fishing, it is best to go a little heavier on the protein percentage to get the fish moving. Utilize something like casein could prove even more valuable in the cooler months to lure the fish to your boilies.
Texture
Never ignore texture. It is needed, and anglers often focus too much on other aspects that get neglected to a certain degree.
You want boilies to appeal to the natural diet of the fish. So, please give it a little pop. You need to apply a delicate crunch to the boilies. For this goal, you can utilize birdseed or even eggshells to give your boilies an additional texture and keep the fish unaware that they are about to be hooked.
Flavors and Scents
Again, never skip or rush this part of the process. You need to apply a strong attraction to get the fish moving and ready to feed. Flavors that are salty and spicy have always worked optimally, but you are free to change it up a bit and see what ultimately works for you.
Oils
Oils can also be added, but it is not necessary. It shouldn’t be too overwhelming or overkill. Oils are just a way to get some added scent to your boilies. Fish oil can get this done and is relatively affordable.
Minerals
Minerals are again optional for creating good boilies, but if you have the time and don’t mind spending a few dollars, it can go a long way.
It is crucial to know the minerals that fish will be lured by, so add them to the mix. It will make your bait even more irresistible.
The Boilie Hair Rig
How to make boilies float? This setup is the best way to use pop up boilies or boilies overall. You are essentially eliminating the fear the fish may have about your bait and allowing them to feel comfortable enough to take a bite.
In the past, anglers who target fish would run into some issues. Some have ejected baits meaning no catch for you.
By utilizing the hair rig set up, you can effortlessly place them out about 2 inches back from the boilies.
How to make boilies float? Once the fish has definitely taken the bait, you will be good to set the hook and haul the fish before you have been found out.
The only thing you want to make sure is to avoid having a hair rig set up that is too lengthy or prone to getting tangled up. This situation will defeat the purpose of the rig set up.
Figures asked questions
One
How to make boilies float? To make boilies float correctly, it needs to have buoyancy. This is a plain and simple fact. How to make boilies float? One method that ensures your boilies will float is to utilize cork balls or pop up the mixture. Without utilizing the right ingredients when you choose to make your own boilies, it will ultimately lead to the boilies sinking instead of floating. This is not an ideal situation depending on your overall goal for the day of angling and how you intend to present the bait.
Two
How to make boilies float? A majority of anglers use floating boilies or pop-ups. All you need to do is attach a small shot or lead weight onto the link just above the hook. In this way, it should be just enough to sink the bait.
Three
How to make boilies float? You can move the weight up and down depending on how high you want your bait to set off the bottom. Every angler has their own preferred height, and you need to apply trial and error. Overall, the rule is 1 to 2 inches. How to make boilies float? Another option is to use a zig rig, which is just boilies popped off the lead. The hook link can have a length of 10 feet or more. Some fish will swim at a certain depth, and the idea of this is to present a bait right in front of them.
Four
How to make boilies float? To make your boilies float, you can squeeze it gently underwater to release a bit of air that is trapped inside since it will soak in water and nail it down with a split shot. How to make boilies float? This is normally used when the bottom is silty, which makes the bait sit above it.
Final thoughts

It is crucial to have an optimal strategy when bating fish. There are tons of baits on the market, but none will promise to be effective, especially if you want to catch a prize fish. One option anglers are turning to are boilies. They are highly effective and can even be prepared at home. It is crucial to know the strategies on how to make boilies float to make sure that your target fish has no other option but to make a beeline straight to your hook.


